
The Varian 2000 GC/MS system is actually three different systems integrated into one instrument, The Varian 8200 Autosampler, the Varian 3800 GC and the Varian 2000 Ion Trap Mass Spectrometer.
For the majority of its users, these systems can be considered separately and the user can allow the software to do all of the integration necessary for their analysis. Within the software the user is able to select and vary all the parameters available for maximizing the resulting chromatographic and mass spectroscopic data.
Within the AutoSampler system, the user is able to establish the size of sample to be injected, the amount of rinsing necessary between samples and the identity of each sample introduced. Within the Chromatograph system, the user has the ability to vary all the parameters available on a common GC system: injection temperature (programmable) , injection method (split vs splitless), electronic pressure control provides for flexibility as to constant flow or flow control methods of chromatography, the column oven has the typical programmability available on all modern systems. The Mass Spectrometer functions as the only detector available on the chromatograph. Within the MS you have the ability to collect data continuously or starting and stopping at any time, you are able to select the mass spectral range over which you want the data collected, and can even do MS/MS analysis.
Getting Started
Loading Software
System Control
Auto Sampler System
Configure Autosampler
Gas Chromatograph System
Injector Control
Split Injection
Splitless Injection
Flow Control
Oven Control
Mass Spectrometer System
MS Control
Data Analysis
Viewing Chromatogram
Viewing Mass Spectrum
Library Searching
Ion Trap Parameters
Manual
AutoTune
Temperatures
Diagnostics
Shutdown
Acquisition
To start the system, the user simply double clicks the Star
Toolbar icon
With that, the Star Toolbar opens across the top of the computer screen as below.

Moving across the Toolbar from left to right are:
| Opens the System Control Screen | |
| Loads Method Builder - Method Wizard | |
| Opens the Automation File Editor | |
| Opens SatView the data processing package | |
| Define, Preview or Print Standard Reports | |
| Create Custom Reports | |
| SMS/MS File Converter | Converts the DOS based MS files into new format |
| A shortcut to do a single injection on the existing method | |
| Security Administration | Allows one to password protect all data |
| View/Edit/Print MS data, Standard and Custom Reports | |
| View/Edit/Print Methods |

To begin an analysis, simply click on the System Control
button ![]() and the System Control Screen will appear with the currently
activated method loaded into the GC/MS.
and the System Control Screen will appear with the currently
activated method loaded into the GC/MS.
This screen has overlaid the GC3800 Monitor window and the Saturn2000 Monitor window. Simply clicking the mouse on either window will bring that window to the front. As seen above, the user can see where the GC is in terms of its conditions/run and also see the TIC chromatograph printed at the bottom of the screen. At the top of the window, the basic analysis operations can be viewed and changed.

File - allows the user to load/activate any existing method file, load/create Sample Lists and load/Create Sequence Lists.
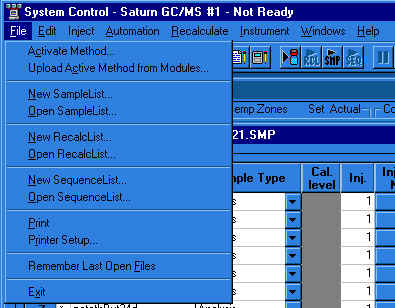
Edit - opens the Method
Editor and allows you to edit the existing method. Clicking on the ![]() will also allow you to
view/edit the current file as well as reactivate the file if changes have been made.
The file needs to be saved and reactivated for the changes to take effect.
will also allow you to
view/edit the current file as well as reactivate the file if changes have been made.
The file needs to be saved and reactivated for the changes to take effect.
Inject - allows the user to do a single injection of
the vial in position 1 of the Autosampler. You can name the file for the data in a
pop-up screen.

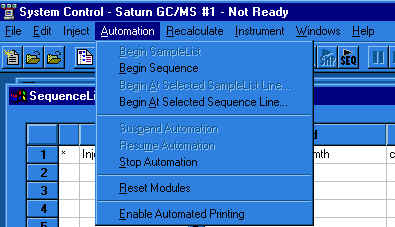
Automation - allows the user to start a multiple
sample run using the selected Sample List and Sequence List. From this selection you can also terminate
an automated analysis currently running.
The Method Editor is used to create new methods or modify existing methods. If
you come into Method Builder using the ![]() button, you will activate
the Method Builder Wizard. On the otherhand, if you use the File menu from the
System Control bar, or click on the
button, you will activate
the Method Builder Wizard. On the otherhand, if you use the File menu from the
System Control bar, or click on the ![]() button, you will go directly
into the Method Editor.
button, you will go directly
into the Method Editor.
The opening screen for the Method Builder is like that below:
From this screen you can edit AutoSampler parameters, MS parameters or GC parameters by simply clicking on the desired topic in the method outline. The GC parameters are edited by system function, Sample Delivery, Injector, Flow/Pressure, Column Oven.
In editing the Autosampler parameters you can change the timing, type of injection and washing parameters. The Standard Mode injects 1 uL of sample and is usually suitable for most samples. If you have particularly unique samples, then you may want to select the User Defined parameters which allow you to change volume size, injection speed and needle residence time. The wash options are limited by the wash solvents available in the wash bottle reservoirs.
In the MS Method Editor, you can set up the Ion Trap to collect data in a number of ways. Line 1 above has been placed in the MS Method to delay turning the filament on while the sample solvent is still eluting. At the end of the FIL/MUL DELAY, the filament in the Ion Trap is turned on and MS data is collected. The length of time the MS will be on, the mass range over which the Trap will be scanned and the type of ionization can all be selected in this screen. In this example, after the delay, electron impact ionization is used with the MS looking at all fragments from 40-650 m/z with all of the detector parameters under the control of the software. Other methods of ionization, as well as SIM and MS/MS can also be set up in this screen. Since the MS is controlled by these parameters, the user can also change analysis conditions during the run. One can set up a smaller scan range over part of the run and one can even change ionization methods during the run.
SatView is the file editor used to view, edit and search the data collected by the
GC/MS. Clicking on the ![]() button any place it is
available on the screen will open the SaturnView Editor. This opening page lets one
select the files that want to be viewed. To select a file, simply double click on
the file and its name will appear in the File Name box. By selecting multiple
files and clicking Open Files these files will be
loaded into a viewing window, stacked one on top of the other.
button any place it is
available on the screen will open the SaturnView Editor. This opening page lets one
select the files that want to be viewed. To select a file, simply double click on
the file and its name will appear in the File Name box. By selecting multiple
files and clicking Open Files these files will be
loaded into a viewing window, stacked one on top of the other.
In this window, simply clicking on the chromatogram with the mouse cursor will generate the mass spectrum for the place that was clicked with a flag showing the location in the chromatogram for the mass spectrum
This view gives the chromatograms from the files. Selecting Chromatogram will allow you to add, subtract and edit the active chromatograms. The mouse can be used to draw a box around the peaks of interest and re-displaying only the region selected.
To do a library search of the selected peak, select Search then Library Search from the task bar and the library search page will open.
Now pressing the Saturn Search button will provide a dialog box from which you can select the library(s) to be searched.
You are able to search by Purity, Fit or Reverse Fit, select or reorder the search libraries as well as select the mass range that is to be searched. Pressing the Search button starts the search.
The search provides a list of the top 25 most likely candidates, along with their library spectrum. By clicking on the compound in the list, the library spectrum is placed in the mass spectrum window along with the mass spectrum of the peak you selected.
The sample delivery section allows for the sample to be delivered through means other than the injection port. Purge and Trap, Head Space and other methods can be controlled through a series of valves. Our GC3800 does not have this capability.
The injection system for the GC3800, allows for split and splitless injection. In clicking on the Injector, the following screen will open:
The front injector is the default, but clicking on the tab will move to the middle and rear injectors. In this screen you can set up each of the injectors for the type of temperature program desired. By clicking the Split Ratio button, you open a screen that allows you to set the split ratio. In the example below, the split ration is on and at a 1000/1 ratio.
To run in a splitless mode, you simply need to turn off the Split State for the desired length of time. In the example below, the injector operates in the splitless mode for 0.5 minutes and then the split is open to a 100/1 ratio.
The GC3800 can be operated in constant flow or pressure flow mode. For constant flow simply enter the flow rate desired and select the On control button. As with the injectors, the front flow control is the default and selecting the tabs will allow you access to the other column flows..
For programmed flow control, simply develop the flow program as shown below:
The oven control allows for the creation of the temperature program for the GC run. As with the other modules, simply create the program by filling in the control parameters. Maximum temperature ramp is 100o/min. This example shows an isothermal run at 100oC.

Sample lists are the way you can instruct the GC/MS to run a group of samples. The sample list allows the user to identify the sample, indicate the number of injections to make from each sample and which vial is represented by the sample. The sample identity also creates the file name for the data. In this example, Air is injected one time and is in vial 1. There will be a file in the data which has the name Air, and will contain the data collected on this sample.
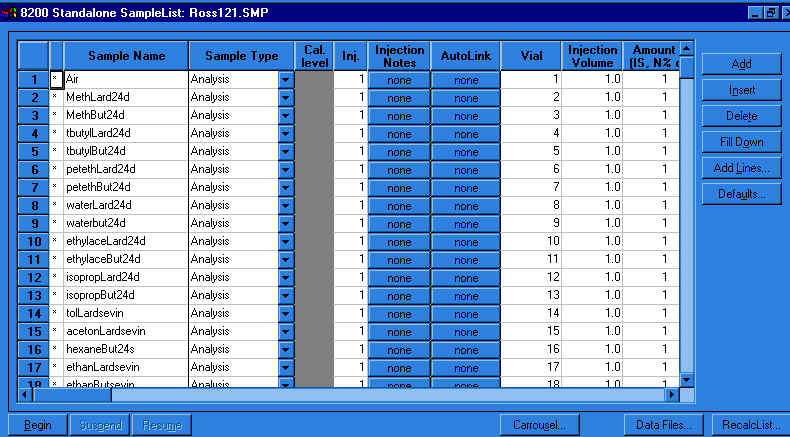
You can also start the analysis sequence from this screen by pressing the Begin button.
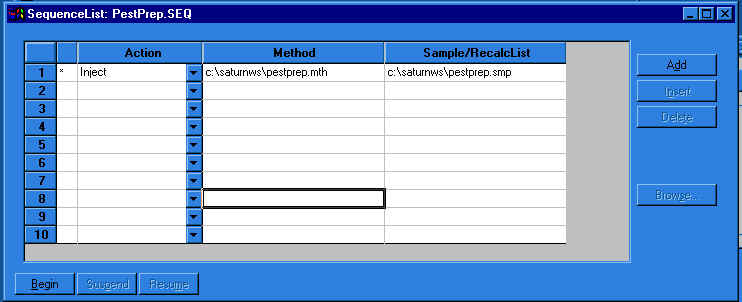
The sequence list allows you to change the method and the sample list within an automated sequence. In this example, we are injecting samples using the pestprep method and the pestprep sample list. Once all of the samples have been run from the sample list, the automation will stop.
From the MS window in the System Control window, one can also modify Ion Trap parameters.
For the occasional user, there is really only two areas of the MS you need to be concerned with, Auto Tune and Acquisition. If the system does not seem to be functioning correctly, the Diagnostics section provides information on where the trouble may be. When all else fails and the instrument seems to have too many problems, Shutdown will provide a gentle way of turning off the instrument. The Temperature section provides the user the opportunity to change the temperatures on the transfer line and trap if the samples injected are particularly fragile.
Manual Control allows the user to make adjustments to SetPoints and run periodic test methods. From this screen the user can turn the trap and any of its components on/of simply by clicking on the component.
The ion trap should be checked for Air/Water leaks every time the instrument is run. In addition, any time the trap has been inactive for a long period of time or if the user has changed trap temperatures, a mass calibration should be run. To check for Air/Water, simply click the box next to the Air/Water Check, the Start Auto Tune button will become active and simply press that button. Any problems will be indicated in the Event Message Window.
To do a mass calibration, simply click the box next to the FC-43 Mass Calibration, again the Start Auto Tune button will become active and press that button. The process of the mass calibration will be recorded in the Event Message Window.
To do a complete Auto Tune, check all four boxes in the Method box and press Start Auto Tune. This will take quite some time, so run this at the end of the day or over lunch.
The normal user will not need to make any changes to this part of the Ion Trap. If the trap has not been used, if the Air/Water levels are too high or if MS data seems to be poor, sometimes a Bakeout may be necessary. Simply press the Start Bakeout button for a 16 hour bakeout. If you want to change the length of the bakeout, highlight the 16 in the Bakeout Conditions, and enter the number of hours you want to bakeout.
For the normal user, click the Run to Completion under the System Test, and click the Start button.
There isn't much to do in the Shutdown section but to shutdown the instrument. Shutdown takes care of shutting off the electronics and lets the user know when the main power switch can be turned off.
The Acquisition mode is the most important mode of operation. If the Acquisition mode must be selected for samples can to be run. Once the Ready and No Faults lights turn green, the MS is ready to acquire data.